The basis of your own MESH scenery are the Elevation Data of your area.
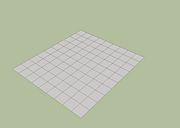 If you want to imagine what MESH actually is, you can imagine a flat handkerchief with a grid of lines drawn on it. If you lay the handkerchief on the surface of a desk, all the points on the grid have the same elevation, i.e. they're at the same elevation as the surface of the desk.
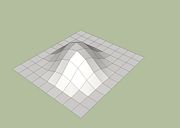
Now lay that handkerchief over a collection of small objects sat on the desk. You'll see the grid is distorted into bumps & dips by those objects. If you then measured the elevation at each intersection of the grid, (relative to the desk surface), you'd have a mesh of elevation data.
The Shuttle Radar Topographical Mission (SRTM) collected that kind of data around the Earth. The collected elevation data are organized in tiles of 1 * 1 degree of the surface, i.e. you'll always have rectangular areas (comparable to our handkerchiefs) to download, while each tile has it's own grid of cells. It's becoming a bit more complicated once you consider that the Earth isn't flat – not even completely round – but we ignore the whole "projection" issue to avoid confusion in the beginning. The world of FS9, by the way, is flat anyway (which has changed in FSX).
Retrieving Elevation Data
You will surely find the best data quality for the USA and for some parts of Europe (1" = 1 arcsec Data), while you can still get very good results with the 3" Data which are available for the rest of the world. Remember that FS9 has it's own limitations regarding resolution, and from a certain extent you'll realize that additional efforts might just not have been worth it in the end. I recently followed a quite interesting thread on that issue here.
There are many sources for elevation data on the internet, but most of them have severe drawbacks, e.g. not supplying the data formats you could read with free tools. In addition, it's a very particular and higly specialized community of professionals in that field – so don't worry if you just don't understand what these people are really speaking about in their forums. You'll learn a lot if you start studying relevant sites, but 99% of the stuff you wouldn't need for (freeware) FS scenery.
- My preferences for data mining, in addition to the USGS seamless server, are the VTerrain or the Viewfinderpanoramas sites. The latter one offers the best quality for many areas, especially mountanious regions, since the SRTM data voids have been filled by other (e.g. map) sources instead of interpolation.
| Server | Data Type | File Format |
| USGS seamless server |
1" US / 3" world |
ArcGrid, Bil, TIFF, GridFloat |
| VTerrain |
links | on various other sites |
| Viewfinderpanoramas |
1" div. / 3" div. |
HGT |
| GLCF (ftp server) |
3" world |
GeoTIFF |
It's critical to retrieve the elevation data in (or convert them to) a file format that SBuilder can import for its internal conversion to a specialized BMP format containing the height field! These are
- HGT (SRTM)
- DTED2 and
- BIL (undocumented and a bit tricky)
Other formats, like GeoTIFF, you might be able to convert to HGT (e.g.) with free tools. Don't forget to let me know in case you found one... 'coz I didn't.
Now let's go get what we require for our scenery:
- Download the required tiles from the usgs server (for the earthexplorer you might have to register).
- You can either zoom the map to theGibraltar area, or add the coordinates for each tile you require manually.
- Then click “Data Sets” (at the bottom). In the next view you open the “Digital Elevation” node and choose “SRTM”, then you click “Results” (at the bottom). Once your resultset is presented, you can control the covered area by showing the Footprint or the Browse Overlay for each file.
- You will then want to download the tiles “SRTM3N35W006“ and „SRTM3N36W006“ to cover more than the required LOD8 tile. Generally speaking, always take care that you download enough tiles, since you’ll have to cover complete LOD8 grid tiles in order to generate mesh.
- Unzip the downloaded data to a temporary work folder called "Gibraltar" on your desktop. You'll find two separate folders, each one containing a BIL file with the relevant name (accompanied with some text files).