Having acquired either HGT or DTM2 format files as your data source, you can use a set of specialized DEM tools, which SBuilder offers under the file menu.
From both the formats you first create a BSQ file as an intermediate step, before converting it into the BMP heightmap. The intermediate BSQ file(s) you can process (which interpolates void data) or merge.
It's pretty easy if you have HGT or DTM files as your data source, because SBuilder "officially" works with them. Let's have a look at SBuilders standard procedure:
- Choose “File --> DEM tools --> HGT (SRTM) to BSQ conversion” and select your HGT file.
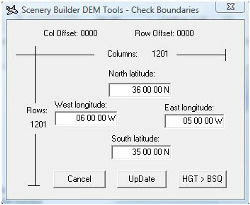 The "Check Boundaries" window opens. As you can see in the picture, SBuilder takes the tiles boundaries from the HGT file, and also shows you its number of rows and columns .
Check and correct the Lat/Lon values according to your tile coordinates, if necessary.
Be careful in case you'd have to change the values: For HGT files, the tile name refers to the lower left corner of the tile, so you'll find the value for "South latitude" and "West longitude" as part of your filename.
But there's also a good chance to enter faulty values by error, because the naming conventions for the different file formats differ!- Finally you click the “HGT > BSQ” button and save a BSQ file.
- Choose “File --> DEM tools --> BSQ to Bitmap conversion” and select your newly created BSQ file.
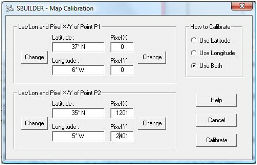 In the following window, correct the Lat/Lon values according to your tile. The tile name (in this case) refers to the left lower corner of the tile, so for the tile “n35w006” you have to change the west longitude from E to W, and the east longitude from 07° E to 05° W.
 - For HGT files, the tile name refers to the lower left corner of the tile, while the input box requires the upper left corner (pixel 0,0) and the lower right corner (pixel 1201, 1201) from you! For the tile “n35w006” you have to change the west longitude from E to W, and the east longitude from 07° E to 05° W.
- Be extra careful here: The naming conventions for the different file formats also differ, so you have to be careful what you enter into this box! Finally you click the “HGT > BSQ” button and save the .bsq file.
- Only if you have several tiles to cover your LOD8 area: Avoid confusion and save all the bsq and bmp files in a separate subfolder. Repeat the conversion (steps 5 + 6) for all the other tiles. In our project repeat it for the “n36w006” tile.
- Only if you have several tiles to cover your LOD8 area: Merge the BSQ files. Choose “File à DEM tools --> Merge 2 BSQs …” and follow the steps. Leave the presets as they are and name the file “n35-36w006.bsq”.
- If you want, SBuilder gives you the option to view, process and up/downsample each BSQ in the “File --> DEM tools” menu. For the beginning I’d recommend to only view them. Processing goes fast, but doesn’t always make the results better.
- The final conversion step: Choose “File --> DEM tools --> BSQ to Bitmap conversion”, select your newly created, merged “n35-36w006.bsq” file and save it to .bmp format.